Configuration initiale de Forefront TMG 2010 :
________________________________________
Follow us on Facebook
Follow us on Google+
________________________________________
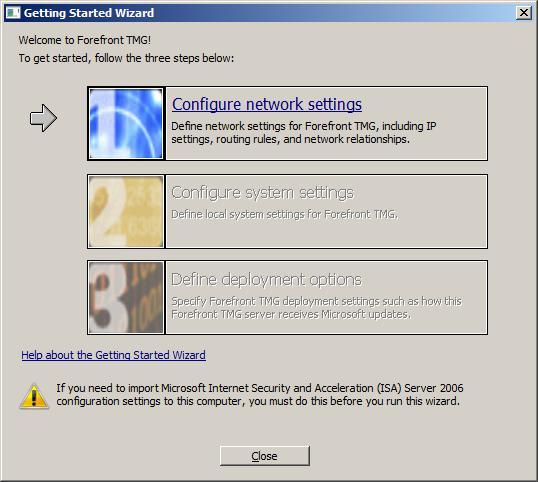
Cliquer sur Configure network settings

Cliquer sur Next

Sélectionner le modèle de déploiement “Single network adapter”.
Cliquer sur Next
 Dans mon cas, la configuration IP était obtenue via DHCP. En production, vu que c’est un serveur, je recommande très fortement l’usage de paramètres IP fixes. Cliquer sur Next

Cliquer sur Finish

Cliquer sur Configure system settings

Ici il est possible de changer le nom du serveur ou son appartenance à un domaine ou groupe de travail. Dans mon cas, la machine est dans un workgroup. Cliquer sur Next

Cliquer sur Finish

Cliquer sur Define deployment options

Cliquer sur Next

Sélectionner Use the Microsoft Update Service to check for updates.
Cliquer sur Next

Ici sélectionner les modes de licences de la protection NIS, de l’antivirus HTTP et du filtrage d’URL. Cliquer sur Next

Choisir ici le mode d’installation des mises à jour (signature antivirus HTTP, signatures NIS) ainsi que le comportement des réponses du NIS. Cliquer sur Next

Choisir ici si vous souhaitez participer au Customer Improvement Program.
Cliquer sur Next

Choisir ici le niveau de remontée d’informations auprès de Microsoft. Cliquer sur Next.

Cliquer sur Finish

Cliquer sur Close
Maintenant on passe au paramétrage des règles d’accès Web
Configuration des règles d’accès Web

Cliquer sur Next

Sélectionner l’option proposée par défaut. Cliquer sur Next

Il est possible de modifier la liste des catégories à bloquer. Cliquer sur Next

Par défaut, il est proposé d’analyser (antivirus http) l’ensemble des contenus Web.
Cliquer sur Next.

Choisir ici si vous souhaitez faire de l’inspection sélectionner L’option proposée par défaut. Attention cependant : cette fonctionnalité nécessite d’utiliser un certificat “trusté” par les postes clients (ce qui peut nécessiter le déploiement sur les postes clients du certificat utilisé sur TMG).

Il est possible de notifier les utilisateurs de la présence de l’inspection SSL (c’est nécessaire légalement dans certains pays). Attention pour faire la notification, il faut déployer et utiliser le client pare-feu Forefront TMG sur les postes clients.
Cliquer sur Next
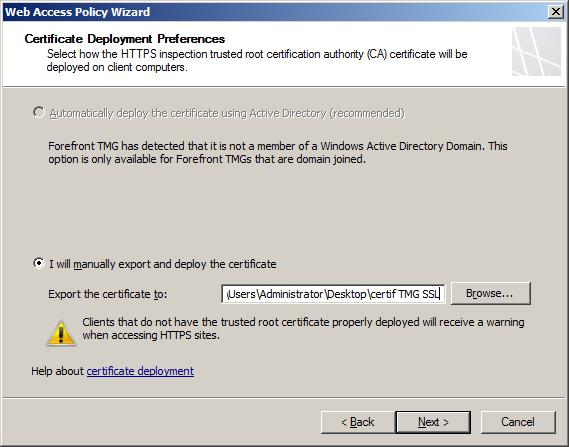
Dans mon cas, le certificat utilisé pour l’inspection HTTPS est un certificat auto-généré que je vais déployer sur mes postes clients. Exporter le certificat sous la forme d’un fichier.
Cliquer sur Next.

Définir ici la taille du fichier de cache du proxy. Cliquer sur Next.

Cliquer sur Finish pour terminer l’assistant de création des règles d’accès Web.

Le serveur est fonctionnel.
________________________________________
Follow us on Facebook
Follow us on Google+
________________________________________
Cliquer sur Configure network settings
Cliquer sur Next
Sélectionner le modèle de déploiement “Single network adapter”.
Cliquer sur Next
Dans mon cas, la configuration IP était obtenue via DHCP. En production, vu que c’est un serveur, je recommande très fortement l’usage de paramètres IP fixes. Cliquer sur Next
Cliquer sur Finish
Cliquer sur Configure system settings
Ici il est possible de changer le nom du serveur ou son appartenance à un domaine ou groupe de travail. Dans mon cas, la machine est dans un workgroup. Cliquer sur Next
Cliquer sur Finish
Cliquer sur Define deployment options
Cliquer sur Next
Sélectionner Use the Microsoft Update Service to check for updates.
Cliquer sur Next
Ici sélectionner les modes de licences de la protection NIS, de l’antivirus HTTP et du filtrage d’URL. Cliquer sur Next
Choisir ici le mode d’installation des mises à jour (signature antivirus HTTP, signatures NIS) ainsi que le comportement des réponses du NIS. Cliquer sur Next
Choisir ici si vous souhaitez participer au Customer Improvement Program.
Cliquer sur Next
Choisir ici le niveau de remontée d’informations auprès de Microsoft. Cliquer sur Next.
Cliquer sur Finish
Cliquer sur Close
Maintenant on passe au paramétrage des règles d’accès Web
Configuration des règles d’accès Web
Cliquer sur Next
Sélectionner l’option proposée par défaut. Cliquer sur Next
Il est possible de modifier la liste des catégories à bloquer. Cliquer sur Next
Par défaut, il est proposé d’analyser (antivirus http) l’ensemble des contenus Web.
Cliquer sur Next.
Choisir ici si vous souhaitez faire de l’inspection sélectionner L’option proposée par défaut. Attention cependant : cette fonctionnalité nécessite d’utiliser un certificat “trusté” par les postes clients (ce qui peut nécessiter le déploiement sur les postes clients du certificat utilisé sur TMG).
Il est possible de notifier les utilisateurs de la présence de l’inspection SSL (c’est nécessaire légalement dans certains pays). Attention pour faire la notification, il faut déployer et utiliser le client pare-feu Forefront TMG sur les postes clients.
Cliquer sur Next
Dans mon cas, le certificat utilisé pour l’inspection HTTPS est un certificat auto-généré que je vais déployer sur mes postes clients. Exporter le certificat sous la forme d’un fichier.
Cliquer sur Next.
Définir ici la taille du fichier de cache du proxy. Cliquer sur Next.
Cliquer sur Finish pour terminer l’assistant de création des règles d’accès Web.
Le serveur est fonctionnel.