Showing posts with label Windows Server 2008 R2. Show all posts

Installation et Configuration Active Directory sous Windows Server 2008 R2 :


DHCP, DNS, Active Directory sous Windows Server 2008 R2 :


 ________________________________________


Follow us on Facebook


Follow us on Google+


________________________________________


I - Installation et Configuration du contrôleur du domaine Active Directory :


Allez dans le gestionnaire de serveur puis faites un clic droit sur Rôles, Ajouter des rôles.


Sélectionnez le rôle Services de domaine Active Directory et cliquez sur Suivant.


Si vous n'avez rien installé précédemment sur votre serveur, vous devrez ajouter des fonctionnalités du framework .NET en cliquant sur Ajouter les fonctionnalités requises.


Assistant Installation des services de domaine Active Directory (dcpromo.exe)


Nous allons maintenant commencer la création de votre Active Directory. Vous aurez le choix entre rejoindre une forêt existante ou créer un nouveau domaine dans une nouvelle forêt. Nous allons créer un nouveau domaine.


Vous allez ensuite pouvoir indiquer le nom
mûrement réfléchi de votre domaine racine de forêt.


En choisi le niveau fonctionnel de la forêt
Windows Server 2008 R2


Vous devrez ensuite indiquer le futur emplacement des fichiers servant à Active Directory. Il est recommandé de placer ces fichiers ailleurs que sur le disque système.


Tapez un mot de passe valide
On y arriver ensuite sur le résumé de l'installation qui va être faite. On peut exporter les paramètres de cette installation afin de la reproduire ailleurs : il s'agit du fichier de réponses exploitable en mode avancé.


L'installation peut prendre quelques minutes et doit se passer sans problèmes.


  • Intégration des serveurs dans le domaine Active Directory


    Aller dans les informations du système ou bouton droit sur post de travail > propriété
    Cliquez sur Modifier les paramètres .


    Dans l’Onglet Nom de l’ordinateur cliquez sur changer 


    Taper ensuit le Nom de Domain
    Et cliquez sur OK


    Entrer le nom et le mot de passe d’un Administrateur du domaine 


     si vous recevez le message ‘Bienvenue dans le domaine’ ça veut dire que le client est bien ajouté au domaine.
    Les clients sont bien ajouter.


Installation et Configuration du serveur DNS sous Windows Server 2008 R2


DHCP, DNS, Active Directory sous Windows Server 2008 R2 :


 ________________________________________


Follow us on Facebook


Follow us on Google+


________________________________________


I - Installation et Configuration du serveur DNS (Domain 
Name System) :


Installation du rôle :

Lancement de l'ajout de rôles depuis la console Gestion de l'ordinateur : 

cliquer sur Ajouter des rôles


Cliquer sur suivant pour validé.


Coché la case 

Serveur DNS


Cliquer sur installer pour lancer l’installation du service DNS


En attende jusqu’au la progression d’installation ce termine


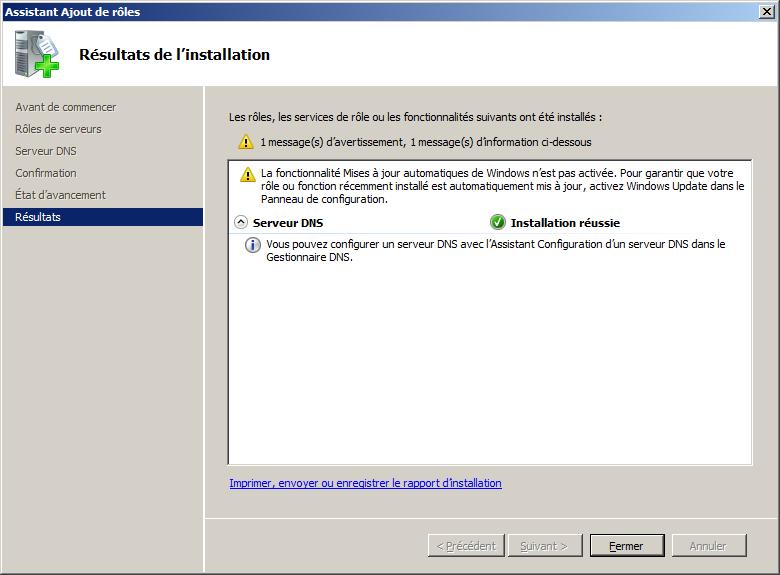
Installation terminé avec succès.

  •  - Création d’une zone de recherche inversée:


La zone de recherche inversée permettre de retrouver un nom d'hôte à partir de son adresse IP. Cela peut-être utile dans certains cas. Cette zone peut être utilisée par les services d'antispam afin de contrôler si l'expéditeur des e-mails est bien le serveur nommé dans les en-têtes e-mail.


Pour ajouter une nouvelle zone inversée DNS, faites un clic droit sur Zone de recherche inversée, Nouvelle zone.


Nous avons besoin d'une zone principale de préférence stockée dans l'AD pour la réplication intersites si vous en avez ou comptez en avoir.


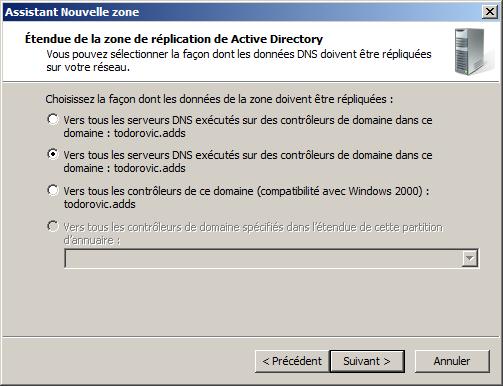
Si vous enregistrez la zone dans Active Directory, vous aurez alors le choix pour la réplication de cette zone. Il existe un bug sur cette partie : les deux premiers choix semblent identiques. Le choix par défaut est généralement le bon.

Un grand changement est intervenu dans la couche réseau à partir de Windows 2008. En effet, Windows 2008 (R2) est natif IPv6. Cela signifie qu'il utilise IPv6 par défaut. IPv4 est bien heureusement utilisable. Lors de la création de la zone inversée, vous devrez choisir le type d'IP (v4 ou v6) qui constituera la zone. A moins que votre réseau soit déjà en IPv6, sélectionnez la zone IPv4.


Vous devrez ensuite entrer l'ID de votre réseau. Mon réseau IP est 172.16.0.0/16. J'utilise notamment les IP 172.16.1.x donc mon ID de réseau sera 172.16.1.


En coche la premier option : mises à jour dynamiques automatiques : en mode manuel, cela induit une charge de travail très conséquente si vous souhaitez avoir des configurations IP attribuées par DHCP.


Enfin, un résumé s'affiche. La zone sera créée lorsque vous terminerez l'assistant de création


Implementation of a DNS Server running Windows Server 2008 Or 2008 R2


  Implementation of a DNS Server running Windows Server 2008 Or 2008 R2

 ________________________________________

Follow us on Facebook

Follow us on Google+

________________________________________

 Introduction :


At the heart of this post, I invite you to see the implementation of a DNS server running Windows Server 2008 or 2008 R2. In fact in 2008 or 2008 R2 manipulations are relatively the same.

Firstly and as an introduction I suggest you see or review the solutions offered by Windows Server for name resolution. Many of you already have the DNS word to mouth. But not only offers Windows DNS solution as there are three distinct solutions!

The first solution is LLMNR is Link Local Multicast Name Resolution. This solution has two weaknesses pale DNS (Domain Name System). The first weakness is that for name resolution via DNS, you have a DNS infrastructure (server and client (s)). Or in a local network, in business, it can be interesting to be able to connect to a machine via a UNC (Universal Naming Convention) rather than its IP address. LLMNR proposes that, by activating the iPv6 and "Network Discovery" (can be enabled in the network center eet sharing). So once its IPv6 and Network Discovery enabled LLMNR can do name resolution. To connect to a machine named PC-Lolokai just type "\ \ PC-Lolokai" (This is the UNC machine).


The second solution is NetBios, which has the same purpose but LLMNR works with IPv4 addresses, and especially with machines running XP or even earlier. NetBios is a service name and a protocol that will be used for compatibility with older Windows network services. LLMNR as it works locally allows for hostname resolution in IPv4 address, it can also "ping" a machine via its UNC. NetBios is enabled by default on a Windows machine.

The last solution is the most common DNS: Domain Name System. DNS resolves names him and supports Internet Services Active Directory domains. This solution is fundamental in a corporate network more or less consistent. That is why we will see step by step how to set up a DNS server. For this post we will start a Member Server standalone ie not install it on our DNS Server Active Directory domain controller.

In writing this post I had some little trouble at VmWare. So I used the machine in the cloud and thank you for this great invention that is the cloud! : D Do not be shocked if you see the screenshots in this post shows a system in English. So I use a machine running Windows Server 2008 R2 in a Workgroup named insert lolokai.local and the machine is called ServeurDNS.


 Installation :


First we must add the role "DNS Server" to our server. For this Start -> All Programs -> Administrative Tools -> Server Manager. You "Add a role" and select DNS Server:


Now the role is installed you just need to configure it.


First we check on how our listening interface DNS server. By default, it listens on all IP addresses associated with the local computer. It is important for you to change: Start -> All Programs -> Administrative Tools -> DNS -> Right click on your DNS server -> Properties -> tab interface.


Then we check if there are root servers, because if our DNS server has not identified the root server, it can only resolve addresses of their network or subnet. For this tab "indicator root."


Then you need to configure a redirection, ie if our DNS server can respond to the request it redirects the request to another DNS server. So we must learn the IP address of the DNS forwarder. Go to the tab "Redirector".


We will go to one of the most important steps the creation area. Indeed, the DNS server works with zones, you create a zone or a namespace where you inform the DNS addresses that should be able to solve.

For this Start -> All Programs -> Administrative Tools -> DNS -> Right click on your DNS server -> New Zone.


Then you will get a window to select what type of area you want to create. It is therefore important to know what areas exist and why?

There are 3 zones: primary, secondary and area stub area.

     The primary zone: when you set a primary zone in DNS server, it is said that in this area he is the "master DNS" zone. This means that this area is what DNS server that has the master zone file ("file example"). The DNS server has full authority over the zone file it is he who edits it and he can read to answer the query.
     The secondary zone: this is when information on our DNS zone already created. He indicates the zone and the zone file master he has the right to read only to meet the request. Only having to create DNS zone as the primary write access. Using this procedé to alleviate traffic when there is a area where a lot of DNS query.
     The stub zone: This zone is very similar to the second zone, the only difference is that it only keeps a copy of the zone file. It does not name resolution, its purpose is just to have a copy of the updated file.

Be chosen for example to create a primary zone and disable recording in the Active Directory as my machine is not connected to any AD.


Once the zone type selected, we are asked to choose whether you want a 'lookup zone "or a" reverse lookup zone. "

     Forward Lookup Zone: The DNS server maps the fully qualified domain name (FQDN) to an IP address.
     Reverse lookup zone: the DNS server matches the IP address FQDN, it must be reversed for the first 3 octets of the IP address and add "in-addr.arpa." Eg to create a reverse zone on the subnet 192.168.1.0/24 is actually a reverse zone whose address will 1.168.192.in-addr.arpa.

For good name resolution in an area are strongly advised to make an area and its reverse zone. So we decided to start lookup zone.


Then we are asked to choose the name of the zone, you may notice that your machine follows the domain name name of our area. Example is in my machine is integrated so there is no field to succeed ". Dns".

Then the utility allows you to create a zone file or use an existing file. In our case we ask to learn and create a file that will edit later.


Once the file is created, we arrive at a window that invites us to make up-to-date. In fact, it is to make up-to-date our zone file. Can allow dynamic updates are allowed machines to be members of the Active Directory and only them to transmit up-to-day zone file. Either we allow all machines to do so. Or otherwise asked not to update to update the zone file this is what we do in the example.

Now our area is created, but it is essential in an area to have two types of registration SOA (Start of Authority) and NS (Name Server).

  • SOA: Defines the basic properties of our zone. Indeed when a zone is created, you must also create its property: ID, main server ...
  • NS: Defines the name servers authoritative for the zone, a secondary server, root server ...
 To access the recording, right-click on the zone in the DNS Manager -> Properties. In the window You can modify the default settings manually or add SOA nameserver.


/!\ ATTENTION: 

the serial number in the SOA can not be invented! It is incremented every time a resource record (mail server, name server ..). It is essential not to touch it because this ID will allow secondary servers whether they have the correct zone file. If the serial numbers do not provide the DNS zone file "master" (where the DNS zone is configured as primary) is sent to the secondary servers.


Now that you have changed your SOA and NS you can add your different machines you have in your network. For this you have 3 options of resource record, a host A or AAAA, CNAME alias or a mail exchanger MX.
  • A or AAAA host: lets just resolve the name of a machine via its IP address. A just means we're talking about an IPv4 address and an IPv6 address AAAA.
  • CNAME alias: as its name suggests it allows you to create aliases. Indeed it can be called a resource alias eg retrieve ftp "ftp1.lolokai.com" to "ftp.lolokai.com."
  • MX Mail Exchanger: simply allows to determine a mail server.
To do this you simply right click on the area and to add or CNAME or MX host.


We implemented a DNS primary zone file. You should be able to do it again with your machines, your IP, your recordings. Last warning we have a zone file but it is only half the work! To make the DNS resolution IP -> FQDN and FQDN -> IP it is essential to create a reverse zone! For this as indicated at the beginning it will be the same records by reversing the first 3 bytes and add "in-addr.arpa."


Conclusion :


We have seen this post through the implementation of a DNS server in Windows Server 2008, as well as different records that we may link.

Installing DHCP in Windows server 2008 :


Installing DHCP in Windows server 2008 :


 ________________________________________

Follow us on Facebook

Follow us on Google+

________________________________________


Presentation:

That your PC can communicate in a network, they must have correct TCP IP setting: same subnet, separate IP address, it must be added to the address of the gateway (the router that can communicate with other networks) and the parameters needed to run your Active Directory (DNS, at least).

Instead of managing this manually by PC PC, just add to your network with a DHCP (Dynamic Host Configuration Protocol) server then distribute your network addresses of your PC and save them correctly in your DNS database.

The DHCP role will allow you to do this with Windows Server 2008 R2.


Role installation:


Launching the Add Roles from the Computer Management console: click on Add Roles


 Check the DHCP Server


When you add the DHCP server role in Server Manager, you can specify whether or not WINS is required for applications on the network. WINS primarily supports clients running earlier versions of Windows and applications that use NetBIOS. Windows 2000, Windows XP, Windows Vista ®, Windows Server 2003 and Windows Server ® 2008 use DNS names in addition to NetBIOS names. Environments that include computers using NetBIOS names and other computers using domain names must include WINS and DNS servers.


If all your network computers running Windows 2000, Windows XP, Windows Vista, Windows Server 2003 or Windows Server 2008, and you do not take care of applications requiring NetBIOS names, you must set the DNS method as your sole method of name resolution. However, before you consider removing the service or not to install WINS servers, identify the computers and applications that rely on NetBIOS and determine the impact of removing NetBIOS. You may find that a critical application relies on NetBIOS (no alternative at the moment), in which case you should continue to use WINS. For example, some older versions of applications, such as Microsoft ® Systems Management Server (SMS) and e-mail configurations Client / Server Microsoft ® BackOffice ® ​​Server using Exchange may require the NetBIOS naming


Windows Server ® 2008 supports DHCPv6 server functionality stateless and stateful. Mode clients use DHCPv6 stateless DHCPv6 to obtain network configuration parameters other than IPv6 address, such as DNS server addresses. Customers configure an IPv6 address through a mechanism not based on DHCPv6, such as automatic configuration of IPv6 addresses (based on IPv6 prefixes included in Router Advertisements) or configuring static IP addresses.

DHCPv6 stateful mode, clients acquire IPv6 address and other network configuration parameters through DHCPv6.


Dans Windows Server® 2008, le service Serveur DHCP est intégré dans Active Directory pour fournir l’autorisation pour les serveurs DHCP. Un serveur DHCP non autorisé sur un réseau peut interrompre les opérations réseau en allouant des adresses ou des options de configuration incorrectes. Un serveur DHCP contrôleur de domaine ou membre d’un domaine Active Directory interroge Active Directory pour obtenir la liste des serveurs autorisés (identifiés par leur adresse IP). Si sa propre adresse IP ne figure pas dans la liste des serveurs DHCP autorisés, le service Serveur DHCP ne termine pas sa séquence de démarrage et se ferme automatiquement.
Ceci est un problème courant pour les administrateurs réseau qui tentent d’installer et de configurer un serveur DHCP dans un environnement Active Directory sans autoriser auparavant le serveur.
Pour un serveur DHCP qui n’est pas membre du domaine Active Directory, le service Serveur DHCP envoie un message de diffusion DHCPInform pour demander des informations sur le domaine Active Directory racine dans lequel d’autres serveurs DHCP sont installés et configurés. Les autres serveurs DHCP du réseau répondent à l’aide d’un message DHCPAck, qui contient des informations que le serveur DHCP de requête utilise pour localiser le domaine racine Active Directory. Le serveur DHCP de départ interroge ensuite Active Directory pour obtenir la liste des serveurs DHCP autorisés et démarre le service Serveur DHCP uniquement si sa propre adresse figure dans la liste.

Fonctionnement des autorisations :

Le processus d’autorisation des serveurs DHCP dépend du rôle installé du serveur sur le réseau. Il existe trois rôles ou types de serveur pour lesquels un serveur peut être installé :
  • Contrôleur de domaine -- l’ordinateur sauvegarde et entretient une copie de la base de données Active Directory et fournit une gestion des comptes sécurisée aux utilisateurs et ordinateurs membres du domaine.
  • Serveur membre -- l’ordinateur ne joue pas le rôle de contrôleur de domaine, mais s’est joint à un domaine dont il est membre avec un compte dans la base de données Active Directory.
  • Serveur autonome -- l’ordinateur n’est ni contrôleur de domaine ni serveur membre d’un domaine. Au lieu de cela, l’ordinateur serveur se fait connaître du réseau par un nom de groupe de travail défini, éventuellement partagé avec d’autres ordinateurs, mais qui ne sert qu’à la navigation et non pour fournir un accès sécurisé aux ressources partagées du domaine.


Installing DHCP in Windows server 2008 ( Video) :